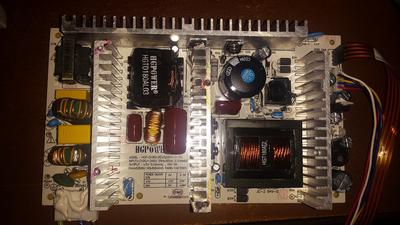
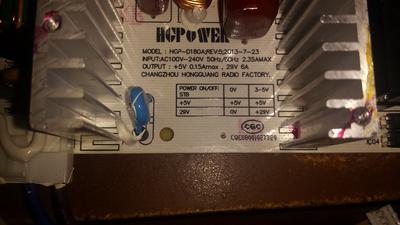
How to open up the Power Supply - pictures for PS #9995678

by rick
(middletown, nj)
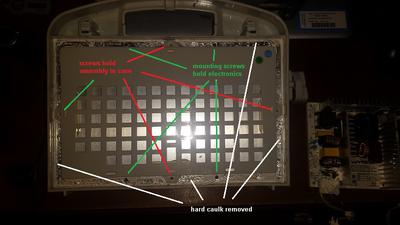
screw locations

screw locations

these are pictures i wanted to post to an already existing topic - 'How to open up the Power Supply'

Comments for How to open up the Power Supply - pictures for PS #9995678

Average Rating starstarstarstarstar

Click here to add your own comments

Jun 07, 2023
Rating
starstarstarstarstar
Bad capacitor C04 now IC02 needed
by: TomO

My power supply appears to have had C04 bulge and explode, which then shorted IC2, because it cracked and burned up beyond recognition.

Can anybody help me identify IC2? It looks to be a "On" brand with the first two letters "RC...."

May 30, 2022
Rating
starstarstarstarstar
Placa D180A
by: Raniel Araujo

Olá tudo bem.
Estou tentando arrumar a fonte com a identificação na placa de D180A, que parou de funcionar.
Desmontei e de cara já vi um transistor queimado, porém está sem a identificação e caso alguém estiver o esquema elétrico para que eu possa identificar o componente em questão, eu agradeço muito.

E-mail: raniaraujoferreira@yahoo.com.br
Desde já agradeço.
Muito obrigado.

Feb 07, 2021
Rating
starstarstarstarstar
Un perro mordió el cable yla fuente se quemó-
by: Luis

Hola, agradezco esta página y el poder dejar las inquietudes urbanas.
Mi problema es que soy Ing. Electrónico y llegó a mi 1 de éstas fuentes, como dije en el titulo, se produjo un corto a la salida. Desarmé la fuente y encontré una parte del primario "volada"... el diodo D2, la resistencia 19 y el transitor Q 03... ëste aparato ya lo tuvo el servicio técnico oficial y su única respuesta fue: "una fuente nueva". No me conforma eso, se que puedo repararla si consigo el circuito eléctrico con los valores de resistencias , diodos y transistores... Podrías Uds. Hacermelo llegar o es de pago?
Desde ya muchas gracias.
mail to: luisdominguez901@msn.com o ldlcservice@gmail.com.
Nuevamente agradecido.

GOOGLE TRANSLATION "Hello, I appreciate this page and being able to leave the urban concerns.
My problem is that I am an Electronic Engineer and 1 of these sources came to me, as I said in the title, there was a short at the exit. I disassembled the source and found a part of the primary "blown" ... the diode D2, the resistor 19 and the transitor Q 03 ... This device was already owned by the official technical service and their only answer was: "a new source" . I am not satisfied with that, I know that I can repair it if I get the electrical circuit with the values ​​of resistors, diodes and transistors ... Could you send it to me or is it for a fee?
From already thank you very much.
mail to: luisdominguez901@msn.com or ldlcservice@gmail.com.
Thankful again."

Jul 14, 2020
Rating
starstarstarstarstar
identification componant
by: dan

Bonjour, je recherche la référence du régulateur de tension coté soudure format de celui ci sot 223?Merci
Sinon une photo pourrait m'aider.
Hello, I am looking for the reference of the voltage regulator on the welding side format of this one is 223? Thank you
Otherwise a photo could help me

May 02, 2020
Rating
starstarstarstarstar
Démontage de la carte
by: Fred

Bonjour,
Confronté au même problème, à savoir comment réparer l'alimentation de mon dolphin 2001. J'ai retiré le mastic epoxy avec un cutter et une spatule. J'ai longé l'espace entre la plaque métallique et la grille plastique. Attention, à l'emplacement des petits rectangles situés sur la grille, vous avez des vis qui maintiennent la grlle plastique et la plaque métallique. J'ai aussi essayé de ramollir le mastic mais il y avait un gros risque de faire fondre la grille plastique. Une fois les 4 vis situées sous le mastic au milieu de chaque côté de la grille, passez la spatule en commençant par un angle entre l plaque métallique et la grille en plastique. L'ensemble se détache tout seul.
Translation: Hello,
Faced with the same problem, how to fix my 2001 dolphin. I removed the epoxy putty with a cutter and a spatula. I worked along the space between the metal plate and the plastic grid. Attention, at the location of the small rectangles located on the grid, you have screws that hold the plastic grlle and the metal plate. I also tried to soften the putty but there was a big risk of melting the plastic grid. Once the 4 screws are located under the putty in the middle of each side of the grid, pass the spatula starting with an angle between the metal plate and the plastic grid. The set comes off on its own.

Apr 01, 2020
Rating
starstarstarstarstar
maytronics pool cleaner power supply repair
by: David J. Mahler

has anyone tried to troubleshoot the actual components on the HGP-D180A power supply board?

Jan 17, 2020
Rating
starstarstarstarstar
power supply Dolphin Wave 65
by: Anonymous

Dolphin Wave 65 - power supply submerged in water over night due to a storm. Can it be fixed easily?

May 01, 2019
Rating
starstarstarstarstar
Opening up the Power supply #9995678
by: Lowcarb NY

rick (middletown, nj),
Thank you for posting the pictures. It was very helpful to know where the 4 screws are.

I started removing the epoxy sealant over the screws with a dremel tool but that created a lot of messy plastic dust. I found that I could soften up the epoxy using a high watt soldering iron (60W instant trigger type) and then dig it out with a small flat blade screwdriver.

Once I removed the 4 screws the remaining epoxy still held tightly to the casing. Working a flat blade in between the epoxy and case I got some separation. Then lightly tapping (inside to outside) on the edge of the case continued to propagate the separation. Working my way around the case inserting flat blades as wedges and tapping I eventually freed the assembly from the case and was able to remove it.

Click here to add your own comments

Join in and write your own page! It's easy to do. How? Simply click here to return to Dolphin Maytronics Repair Comments.